This tutorial walks you through creating and running an Azure Data Factory pipeline that runs an Azure Batch workload. A Python script runs on the Batch nodes
Prerequisites
- An Azure account with an active subscription.
- A Batch account with a linked Azure Storage account.
- A Data Factory instance. To create the data factory, follow the instructions in Create a Data Factory.
Create a Batch account, pools, and nodes
- Sign into a Batch account with your Azure credentials.
- Select your Batch account.
- Select Pools on the left sidebar, and then select the + icon to add a pool.
- Complete the Add a pool to the account form as follows:
- Under Pool ID, enter custom-activity-pool. (User Defined)
- For Select an operating system configuration, select the
- Image Type - Marketplace
- Publisher – almalinux
- Offer – almalinux
- Sku – 9-gen1
- For Choose a virtual machine size, select A1_v2.
- Under Dedicated nodes, enter 1.
- Select Save and close.
- Select Pools.
- Select Nodes on the left sidebar, and then select the node
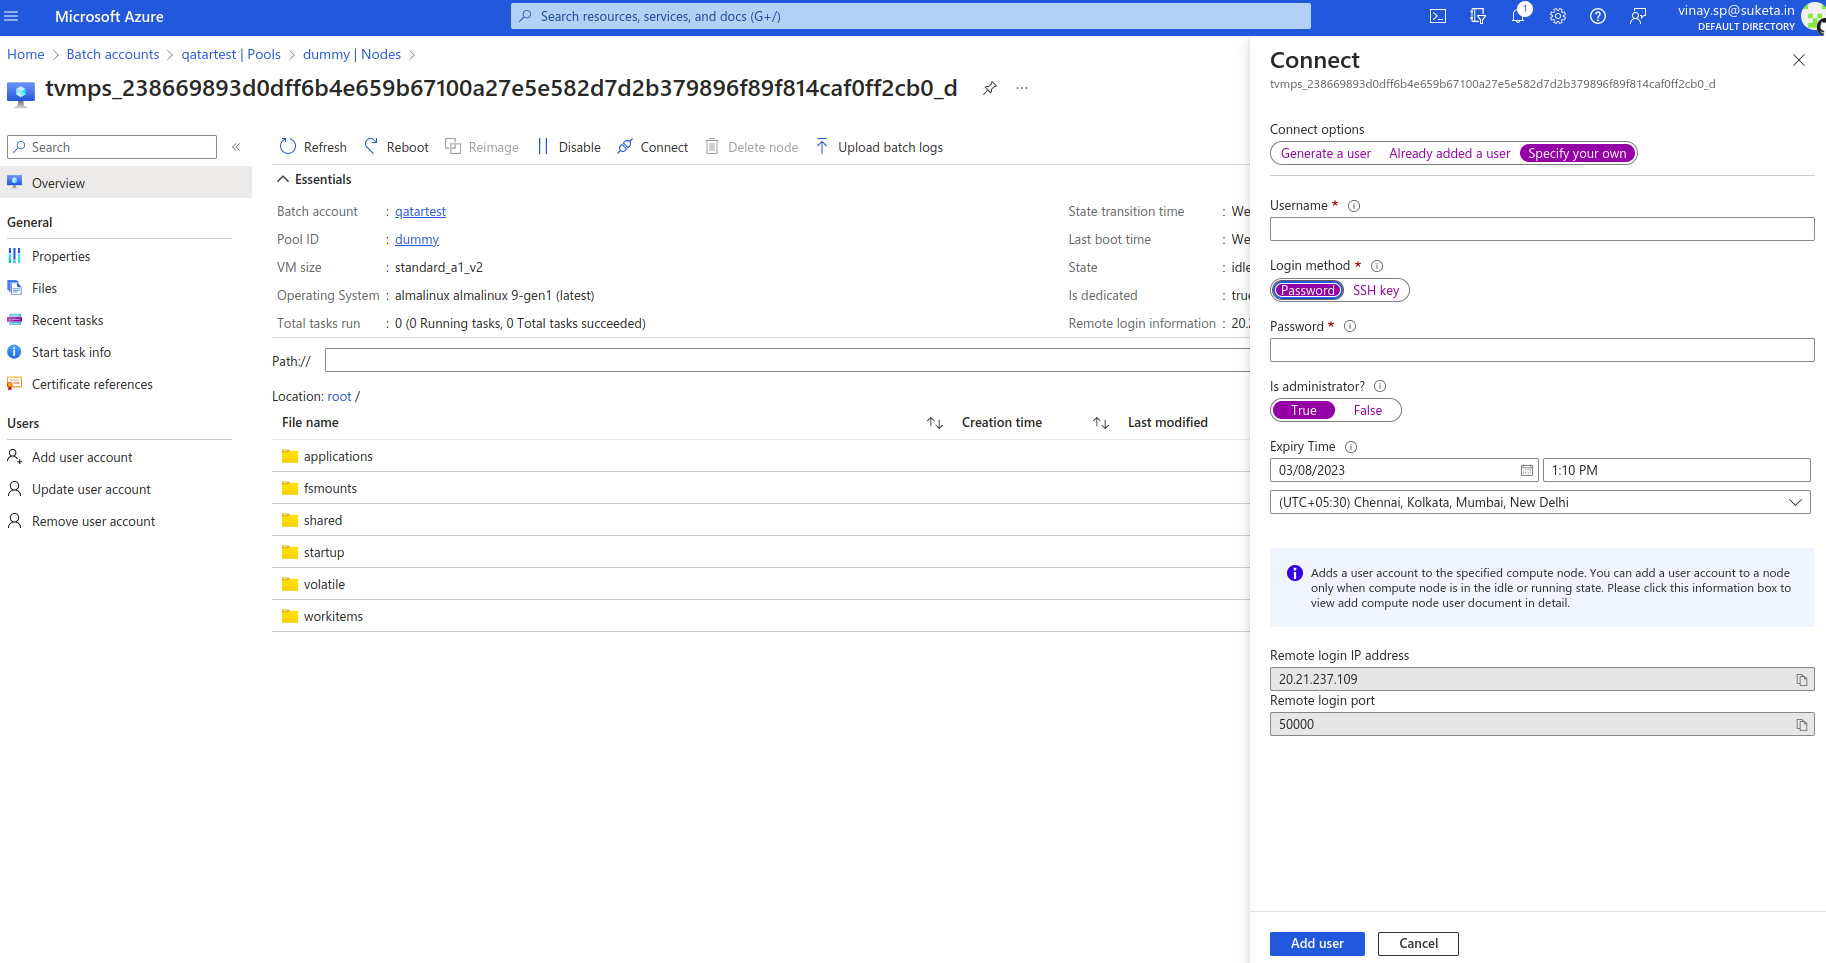
- Select connect icon
- Select specify your own
- Enter Username
- Select Login method as Password
- Enter Password
- Is administrator-> TRUE
- Select Add User
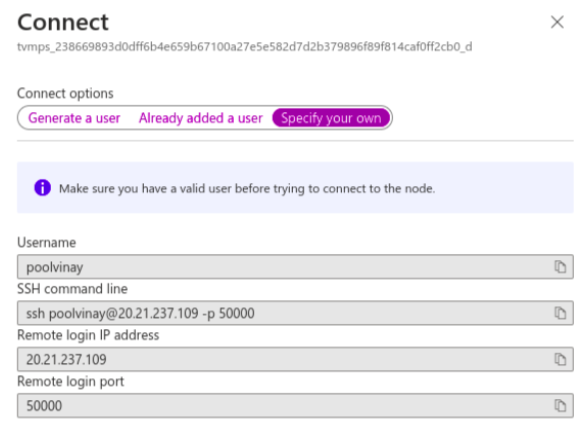
- Copy SSH command line
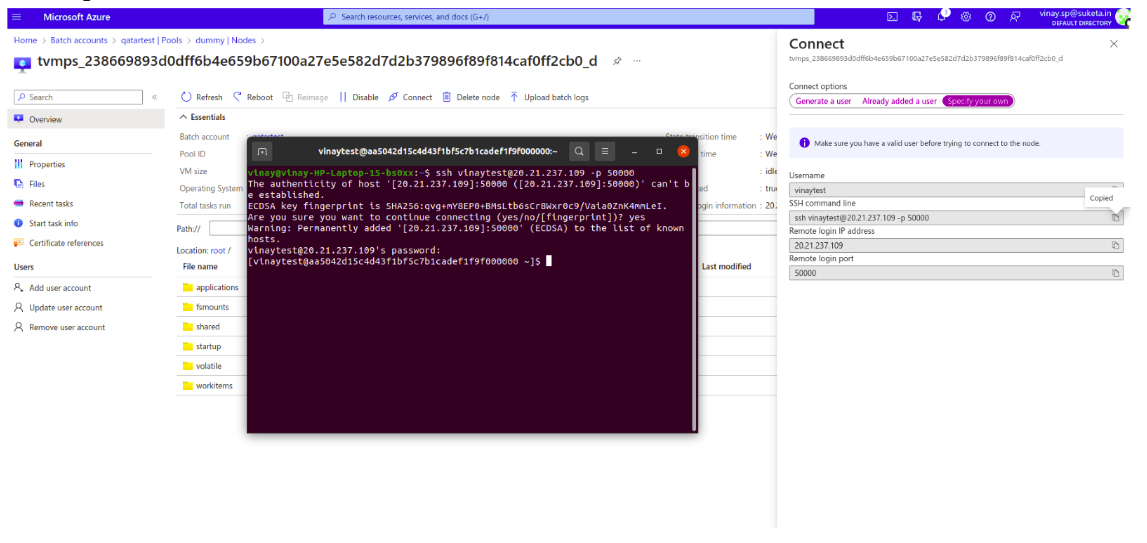
- Open terminal in local machine and copy pastes SSH command line
- Enter password to make connection.
-
After successful SSH connection run below command to install python3, pip3 az-blob-client, requests, and tqdm
sudo yum install python3-pip -y && sudo python3 -m pip install azure-storage-blob pandas requests tqdm
Create blob containers
- Create Storage Account
- Select containers under Data storage and select + container icon
- Enter container name in the entry field as Input.
- Select create.
- Select containers under Data storage and select + container icon
- Enter container name in the entry field as Output.
- Select create.
Develop a Python script
The script needs to use the connection string for the Azure Storage account that's linked to your Batch account. To get the connection string:
- In the Azure portal, search for and select the name of the storage account that's linked to your Batch account.
- On the page for the storage account, select Access keys from the left navigation under Security + networking.
- Under key1, select Show next to Connection string, and then select the Copy icon to copy the connection string.
- Paste the connection string and save it.
- Select storage account
- Select the Input container, and then select Upload > Upload blob in the right pane.
- On the Upload blob screen, Select Browse for files
- Browse to the location of your python script, select Open, and then select Upload.
Set up a Data Factory pipeline
Create and validate a Data Factory pipeline that uses your Python script.
Get account information
The Data Factory pipeline uses your Batch and Storage account names, account key values, and Batch account endpoint.
- From the Azure Search bar, search for and select your Batch account name.
- On your Batch account page, select Keys from the left navigation.
- On the Keys page, copy the following values:
- Batch account
- Account endpoint
- Primary access key
- Storage account name
Create and run the pipeline
- If Azure Data Factory Studio isn't already running, select Launch studio on your Data Factory page in the Azure portal.
- In Data Factory Studio, select the Author pencil icon in the left navigation.
- Under Factory Resources, select the + icon, and then select Pipeline.
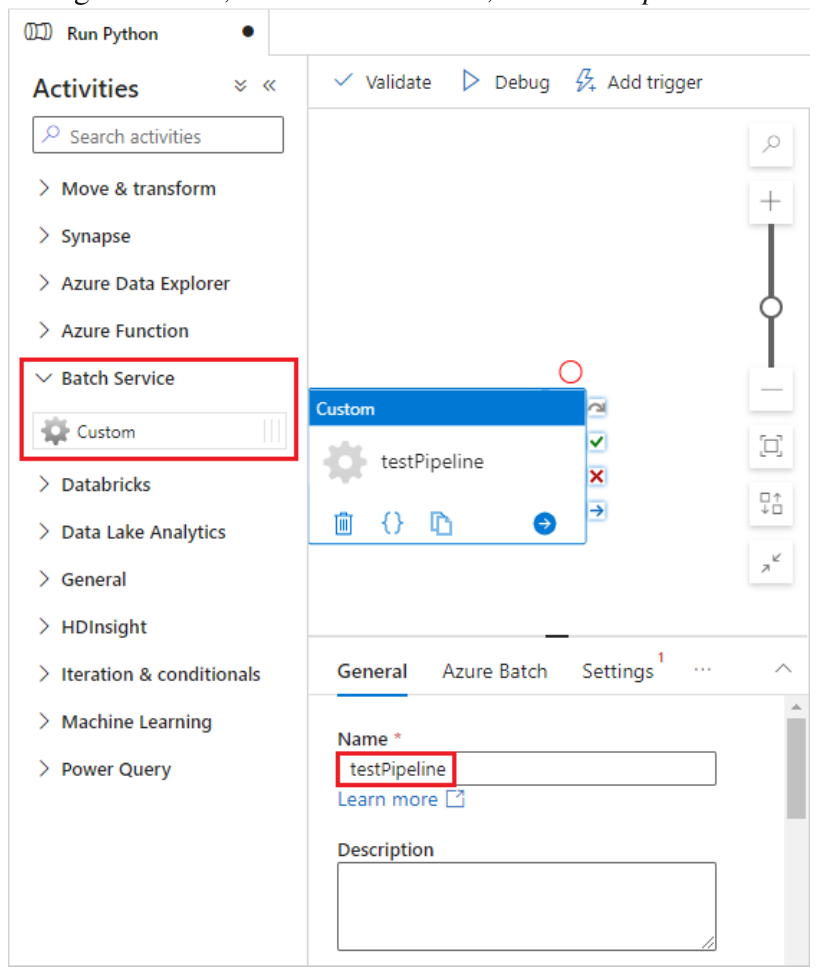
- In the Properties pane on the right, change the name of the pipeline to Run Python.
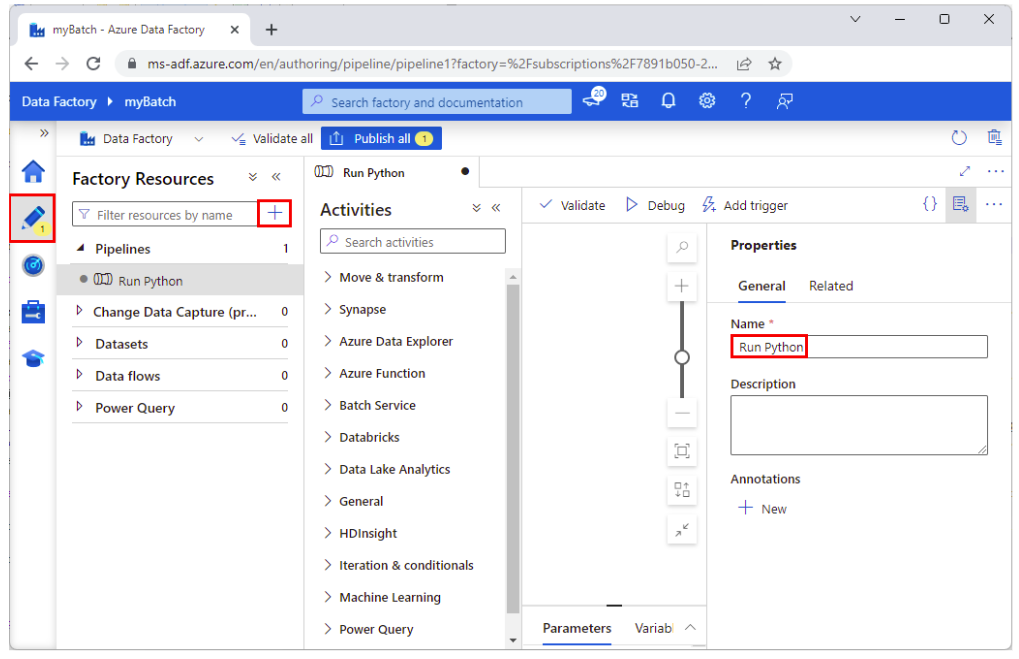
- In the Activities pane, expand Batch Service, and drag the Custom activity to the pipeline designer surface.
- Below the designer canvas, on the General tab, enter testPipeline under Name.
- Select the Azure Batch tab, and then select New.
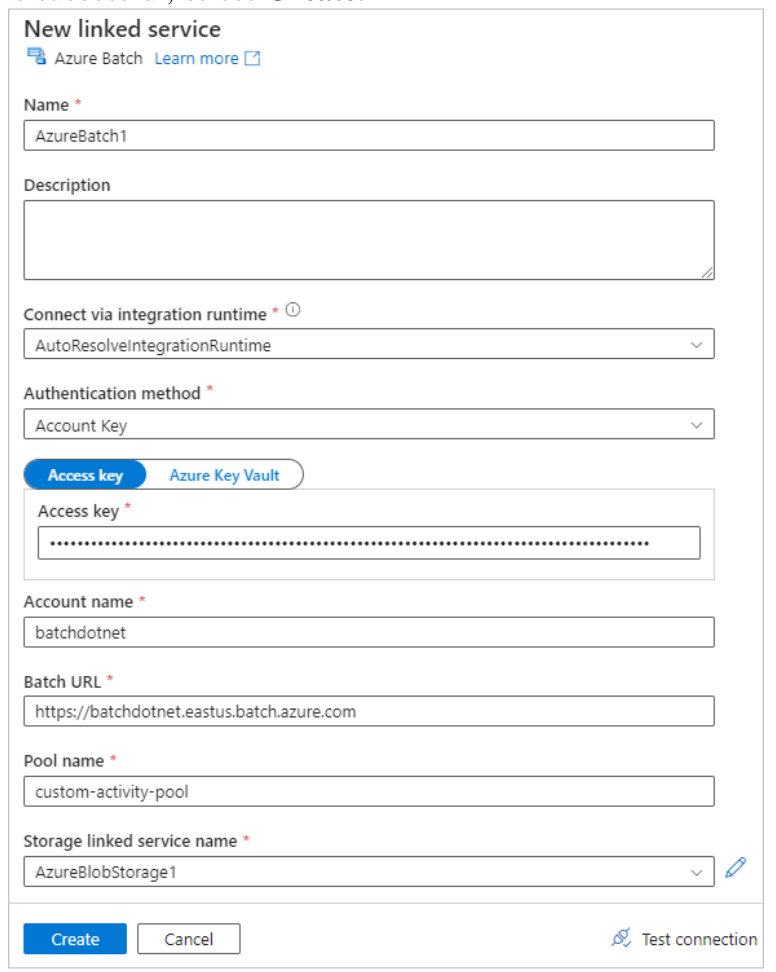
- Complete the New linked service form as follows:
- Name: Enter a name for the linked service, such as AzureBatch1.
- Access key: Enter the primary access key you copied from your Batch account.
- Account name: Enter your Batch account name.
- Batch URL: Enter the account endpoint you copied from your Batch account, such as Batch URL.
- Pool name: Enter custom-activity-pool, the pool you created in Batch Explorer.
- Storage account linked service name: Select New. On the next screen, enter a name for the linked storage service, such as AzureBlobStorage1, select your Azure subscription and linked storage account, and then select Create.
- At the bottom of the Batch New linked service screen, select Test connection. When the connection is successful, select Create.
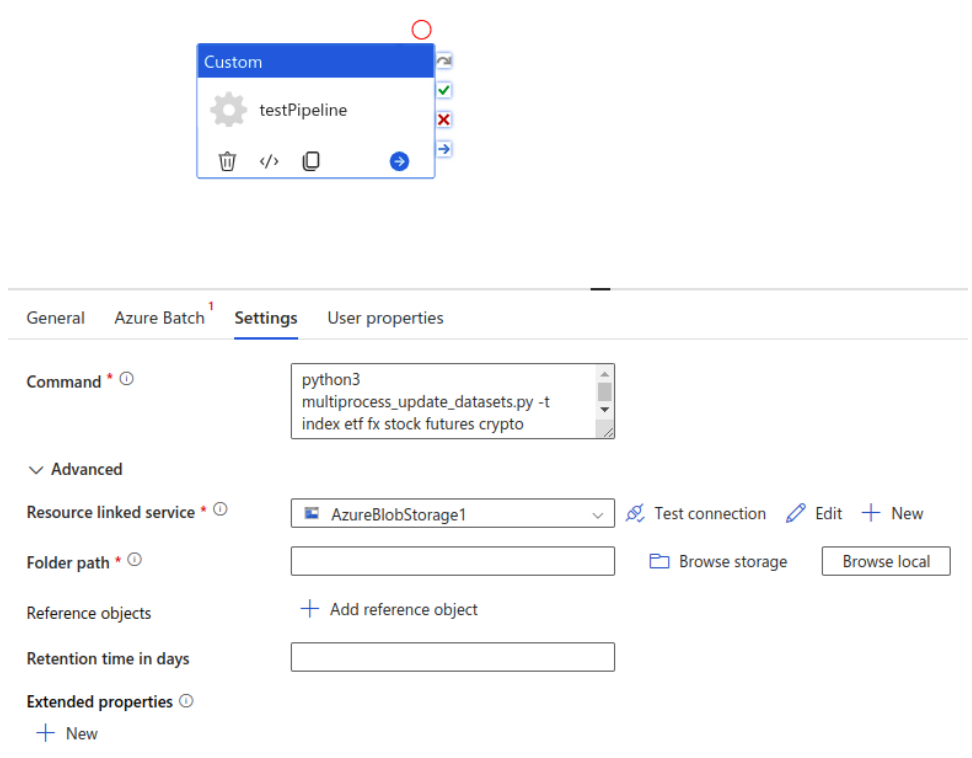
- Select the Settings tab, and enter or select the following settings:
- Command: Enter -> python3 multiprocess_update_datasets.py -t index etf fx stock futures crypto optionsdata -p day week month --save_zip_local false --multiprocess true – containerName OutputContainer name
- Resource linked service: Select the linked storage service you created, such as AzureBlobStorage1, and test the connection to make sure it's successful.
- Folder path: Select the folder icon, and then select the container and select OK.
- Select Validate on the pipeline toolbar to validate the pipeline.
- Select Debug to test the pipeline and ensure it works correctly.
- Select Publish all to publish the pipeline.
- Select Add trigger, and then select Trigger now to run the pipeline, or New/Edit to schedule it.

To check log files in AZ
Batch/pools/nodes/root(selectnodes)/workitems / adfv2-update-datasets / job-1 / f48304e6-5ce4-4bad-b8d1- 5adc7f15e0a8/stderr or stdout.txt