Understanding JSON Web Tokens (JWT) A Comprehensive Guide
What is cryptography?
Cryptography is the practice of secure communication in the presence of third parties. It involves the use of mathematical algorithms to encode and decode messages, making it difficult for unauthorized individuals to read or modify the data being transmitted. It involves techniques such as encryption, hashing, and digital signatures to ensure that messages are protected from unauthorized access or tampering.
Let's look into a brief definition for each of them
Encryption
Encryption is the process of converting plain text into cipher text. Plain text is the original message that you want to protect, while cipher text is the encrypted message that is sent. The recipient of the message would then use a key to decrypt the message and convert it back to plain text.
Hashing
Hashing is the process of converting any message or data into a fixed size string of characters. This string is unique to the original data, and any changes made to the data will result in a different hash value. Hashing is often used to verify the integrity of data and to ensure that data has not been tampered with.
Digital Signatures
Digital signatures are used to ensure the authenticity of the sender of a message. They are created by taking a hash of the message and encrypting it with the sender's private key. The recipient of the message can then decrypt the digital signature with the sender's public key to verify that the message was indeed sent by the sender and that it has not been tampered with.
Key Management
The most critical aspect of cryptography is key management. Keys must be kept secret and not shared with unauthorized individuals. They must also be changed periodically to ensure that the messages remain secure. It is also essential to have a plan in place for what to do if a key is lost or compromised.
Overall, cryptography plays a crucial role in securing communication and protecting sensitive information from adversaries. The two types of cryptography are:
1. Symmetric cryptography:
This type of encryption is used when the sender sends information encrypted by a key and the receiver must have the same secret key to decrypt the transmitted information. This mechanism is simple and faster to use but, less safe as, if one of the keys gets hacked by a third party they can easily decrypt the data.
Now, let's discuss a much safer and more sophisticated approach to encryption and decryption.
2. Asymmetric cryptography:
This type of encryption involves the use of two keys - a public key and a private key. Here, the public key is used to encrypt the message and send the ciphered information and the private key is used by the receiver to decrypt the ciphered data. In this type of cryptography, one of the two keys is kept secret which is used for decryption generally. The advantage of using public-private key encryption is that it ensures security, confidentiality, and integrity for the messages shared between two parties.
Here’s an example of how asymmetric cryptography works.

If Alicia wants to send a message to Robert, she uses Robert’s public key to encrypt the message and sends the encrypted message to Robert. On the other end, Robert can view the message sent to him only after decrypting it using his own private key which is confidential and only with him.
An alternate use is, if a web server wants to send information to its clients, it encrypts the messages with its private key and distributes the public key among its clients. The clients then use this public key to decrypt the messages. Thus, public and private keys can be used interchangeably for the encryption-decryption of information depending on the use case.
Now that we have a background of the basics, let's jump into the most awaited topic of the blog!!
What is JWT?
JWT stands for JSON Web Token and is pronounced as “JAWT”.
Now, what exactly does it mean or where do we use it?
So, JWT is an open industry standard( RFC 7519) used to make information exchange between two parties, usually the client( for example the front-end of an app) and the server(for example back-end of an app). In simple words, when a user logs into a website for the first time, he is issued a token that contains all the user information and an authorized signature, all encrypted, this token is stored on the user's browser. Whenever the user logins into the website after this, the website can easily identify the user and show relevant information to him.
Whereas, with the traditional method of using the sessions and cookies, the session IDs are saved on the server side with the user information, and cookies are saved on the user’s browser. The downside of this approach is that it becomes very hard if the scale of the application increases, every server of the application needs to have information on all the users. And that's where JWT becomes more reliable and efficient.

How does JWT work?
JSON Web Tokens (JWT) work based on a three-part structure consisting of a header, payload, and signature.
Header
The header typically consists of two parts: the type of token, which is JWT, and the signing algorithm being used, such as HMAC SHA256 or RSA. It is then Base64Url encoded to form the first part of the JWT. The header contains information about the token type and signing algorithm.
Payload
The payload contains the claims, which are statements about an entity (typically, the user) and additional data. There are three types of claims: registered, public, and private claims. The payload is also Base64Url encoded.
Signature
To create the signature part, you have to take the encoded header, the encoded payload, a secret, and the algorithm specified in the header, and sign that. Putting all three parts together, the resulting JWT is a string of characters, separated by dots, that can be used for authentication and authorization. The signature is created by combining the encoded header and payload along with a secret key known only to the server. The signature verifies the integrity of the payload and ensures that the claims have not been tampered with.
Working:
When a client sends a request to the server, the server generates a JWT token and sends it back to the client. The client then includes the JWT token in the header of all subsequent requests to the server. The server verifies the token on each request by checking the signature and decoding the payload to ensure that it has not been modified. If the token is valid, the server grants access to the requested resource.
Why use JWT: Major advantages of using JWT is that it allows for stateless authentication, meaning that the server does not need to store session data for each user. This makes it easier to scale applications that use JWT for authentication.

How to apply JWT authentication to a .NET core web API?
In this section, let’s get some hands-on experience in securing a minimal API endpoint in .NET Core using JASON Web Token for authentication and authorization.
Following are the steps to create a .NET Core Web API with JWT authentication in Visual Studio 2022:
-
Firstly, launch Visual Studio 2022 and click on “Create a new project”.
-
Search for the “ASP.Net Core Web API” template on the window that follows, select the template, and click Next.
-
Name your project and select your desired location to store the project, leave the check box “next to place solution in the same location” checked based on your preference, and click Next.
-
In the “Additional Information” window that follows,
→ choose .NET 6.0 ( or any other long-term support version during the time of creating the project)
→ Leave the “ Authentication Type” as None(default).
→ Uncheck the boxes, next to “ Use controllers” as we will be using minimal APIs here and the one next to “Enable OpenAPI support” as we will be using Postman to test our API endpoints.
→ click on Create.
Following the above steps creates a new project.
-
Add the required NuGet packages
→ To do this, on the Solution Explorer panel right click on the project and select “Manage NuGet packages..”
→ Search and add “Microsoft.AspNetCore.Authentication.JwtBearer” ****NuGet package to use JWT authentication in ASP.NET Core. You can alternatively install the package via the NuGet package manager console by entering the following command:
Install-Package Microsoft.AspNetCore.Authentication.JwtBearer

-
Setting up the Hello World endpoint
On creating a minimal Web API project on Visual Studio, a program.cs file gets created. Let’s implement a simple hello world endpoint to understand the working, in this tutorial. For that, replace the existing code with the following code in the program.cs file.
{{< gist vinaykumarsp 44578414f27bf7242decf937cd924fe8 >}}
In the above code snippet, the UseAuthorization() and UseAuthentication()methods register the authorization and authentication middleware respectively. The RequireAuthorization( )method specifies that the authorization is required to get the API endpoint ( i.e “Hello World” message in this case) via the MapGet method.
-
Specify the secret key in the “appsettings.json” file
In this step, we create a new section to hold the Issuer, Audience, and the secret key in the appsetting.json file which will be used later to generate a JSON Web Token.
Note: The name of the section can be anything, I have used “JWT” as the name.
{{< gist vinaykumarsp cc6604186bff1df41784c9224a0868ff >}}
-
Configure authentication
Add the following code to the program.cs file to set up the authentication middleware and configure the authentication via JWT.
Add the following namespaces:
{{< gist vinaykumarsp cb0554ca34a9dbf3b457077133ff7d7b >}}
Add the authentication and authorization services:
{{< gist vinaykumarsp 7dfa0585bcd60334bf6e9127b5990d32 >}}
In the above code, the DefaultAuthenticationScheme property is used to specify the default authentication for the JwtBearer middleware, when the middleware handles an incoming request. The DefaultChallengeScheme property is used so that, if authentication fails, the middleware will issue a challenge to the client using the default challenge scheme specified here. And lastly, the DefaultScheme property is used so that, if an authentication scheme is not explicitly specified for an endpoint, the middleware will default to the JWT bearer authentication scheme.
Additionally, the call to the AddJwtBearer method helps configure token parameters. The TokenValidationParamaters instance is used to indicate if parameters like Issuer, Audience, Key, and Lifetime information need to be validated.
-
Setup an endpoint to generate JWT
In order to authorize calls to the API, we need to write the code that generates and validates the JWTs. When an initial request is made to the API, a token is generated in response to it, which can then be copied and used for authorization in all subsequent requests.
Add the following to the program.cs file:
{{< gist vinaykumarsp 57f26f73533a284593a2d0aac829629b >}}
The above code, adds a new HTTP Post endpoint that generates a JWT for an authenticated user. The endpoint takes in a User object containing a username, email-id, and password. If the provided username and password match the user details stored in the file, the endpoint creates a new JWT taking the details of the issuer, audience, and key from the configuration file, with an expiration time of 10 minutes(you can set it to the desired time in the Expires field, according to the application's requirement). The JWT contains a unique identifier, the provided username, the user's email, and a randomly generated identifier jti. The JWT is signed using a symmetric security key and the HMAC-SHA256 algorithm. Finally, the JWT is returned as a string. If the username and password do not match, the endpoint returns an unauthorized status code.
-
Create a User model
Notice that in the above program.cs file the User class is not recognized, so now let's create the User class. To do this, open the Solution Explorer window and right-click on the solution, select ‘add’ and choose ‘class’. Name the new class file as User, this creates the User.cs file. This file stores the login credentials of the users.
Add the following to the User.cs file.
{{< gist vinaykumarsp c320aa61c3f323846e83b9b73824d89e >}}
-
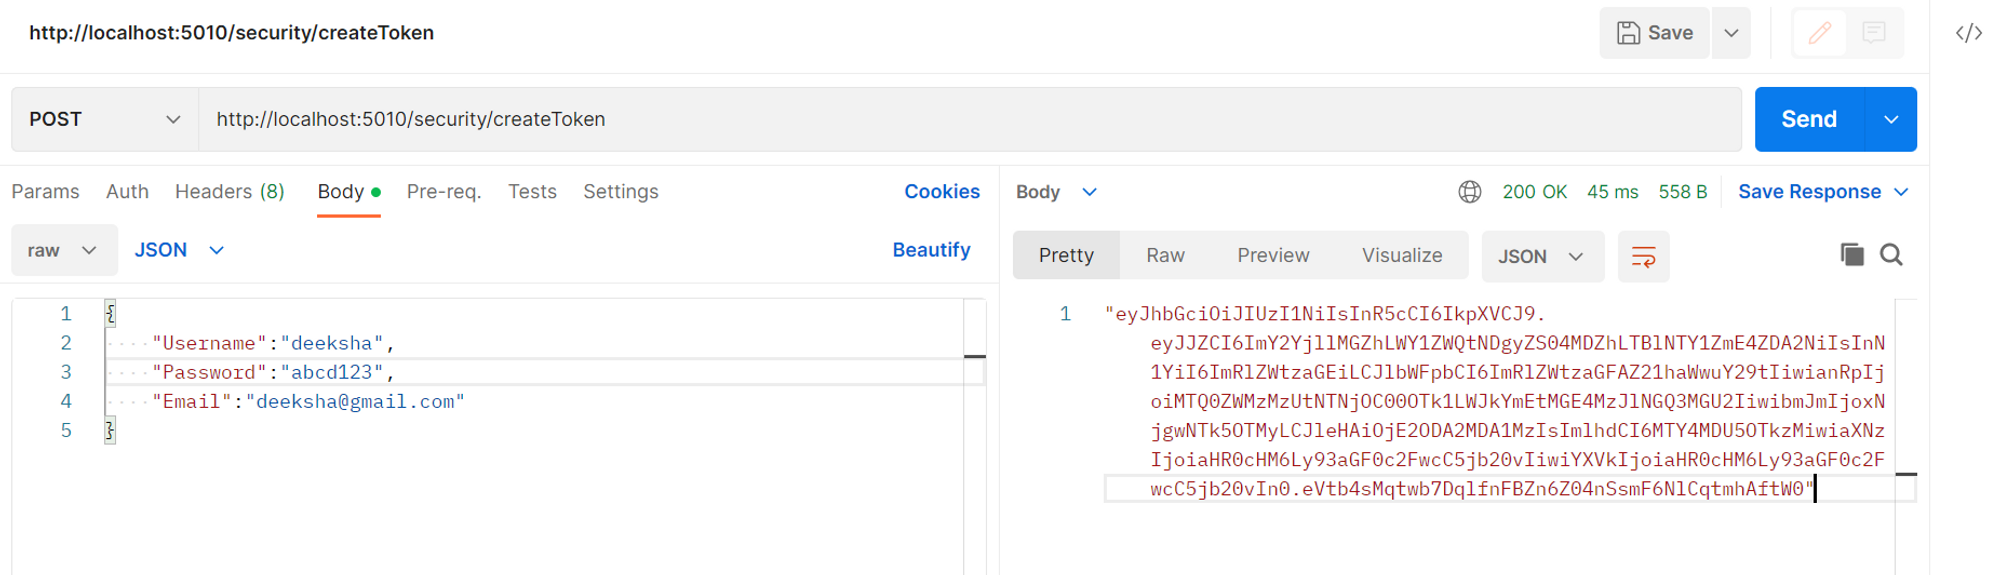
Testing the JWT authentication on POSTMAN
Open Postman and create a new post request by entering the create token endpoint we specified during the setting up of the endpoint in the program file. In the request body, enter the user credentials. The following output shows the response, which is the generated JSON Web Token.
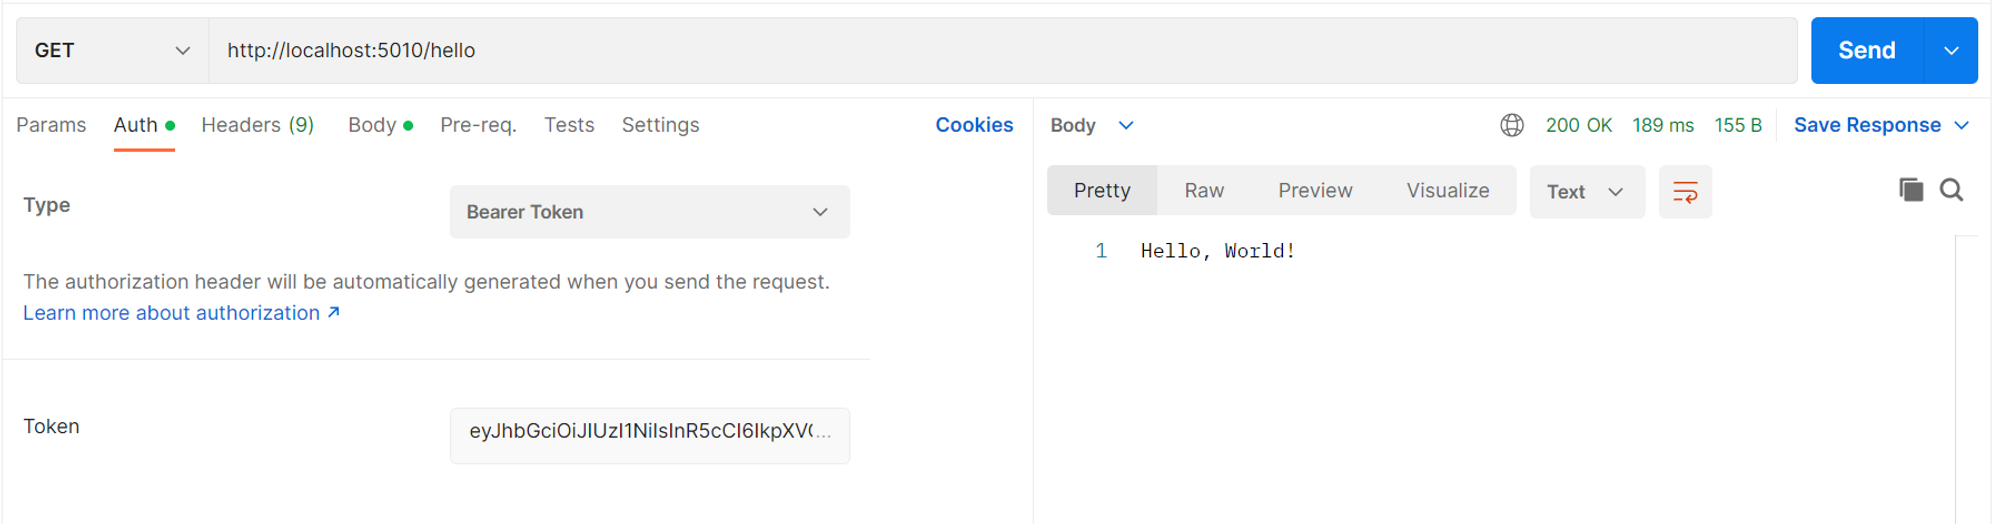
Now, get the hello world response by calling the HTTP GET method and passing the above generated token as a bearer token in the request header. If the generated token is valid, the following message is shown.
Check out the whole project folder here: GitHub